Saturday, April 7, 2012

Tie-Dyed Easter Eggs- 2012 edition

if you follow my blog, or know me personally- then you know that I have a favorite way to dye Easter eggs! if you want instructions on how to do this yourself, read my first post.

this post will be mostly pictures.

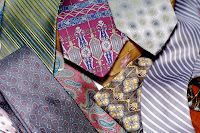
 you will need: ties, scissors, string, stock pot, & eggs.
ties must be 100% silk. go to Goodwill or to your local thrift store, I spent $20 on 7 ties.
 I'm most excited for the whales, obviously.
 destroyed! you should be able to dye 2 eggs with 1 tie. you can also use the ties more than once.
 I like to use the fat bottom part of the tie. turn the print TOWARDS the egg, try to flatten the image as much as you can on one side...
 fold up all edges and secure with string- I used yarn because it's what I had at home.
 boil for 20 minutes. allow the eggs to cool to the touch and then...
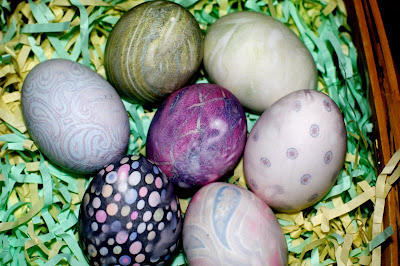
 reveal! THE BEST PART.
I thought this tie wasn't going to work because it was really shiny, but I was so impressed and happy with how it turned out!
 TA-DA!
 I always put my favorite eggs in the front.
 I was disappointed with the paisley print, but loved the black & pink print, whales, and purple stripes.
 this green tie really surprised me! the print reminds me of hieroglyphics on the egg.
if you try this please leave me a link in the comments so I can see them!!

*you can NOT eat the eggs. something in the ties is toxic. besides that, 20 minutes is a overly-hard-boiled egg, if you ask me.
**greys and pastels do NOT make for a good looking egg.
***the WORST print you can find is usually the best looking egg.
****the darker the  print= the better the transfer.

Wednesday, March 31, 2010

favorite finds on Etsy

today I thought I would share some of my finds on Etsy!  I realize that when people post their finds (or I stalk their favorites on Etsy, whichever) I am usually inclined to purchase one of them.  people have  an eye for greatness or search out items that I may never find on my own- it's like a treasure hunt, only they've done all the work!  yesterday I was stalking someone's favorites that marked our shop as a favorite and I bought this painting.  I know, right?  I absolutely LOVE Watercolor and more importantly, adore cute little bunnies!  getREALE is featuring a "20 Bunnies" series in their Etsy shop right now.

here are my great finds on Etsy today:

 Diclonius Horns Lucy Nyuu Nana from Elfen Lied by FeralWorks

 I'm trying to figure out what I can be for Halloween this year using these ears.  I already have a pink wig, so I'm half way there!


Pirate Robot by sleepyrobot13

um, hi- a Pirate AND A Robot combined into one tiny mass of adorable?!  yes please!

Headless Horseman Macbook Vinyl Decal by suzieautomatic

GENIUS.  (I'm pretty sure we need this.)

and lastly,
 XL Mens Pink Narwhal vs Zombies shirt by tinaseamonster

I have a little bit of jealousy that I didn't think of this first.

Monday, March 29, 2010

new use for inanimate objects

 YAY!  new project idea!  my mother in law gave me these flooring samples because she thought I could do little drawings or paintings on them.   what sort of genius is she, really?!


my first rule was that I would work from top to bottom and try a different picture on each one.  then I thought I would do one a day...  which sounds great.  and ambitious.  but even I know myself better than that and there's no way I could make that happen.  so I figure, we'll just ride this wave out and when I have an inkling in me to drawing a tiny little...  something, I will do it.

here's what I did:  (oh!  tip: these little tiles have a great tooth on them- think Bristol paper for drawing- so it takes to color pencils, charcoal and oil pastels easily.  I will get to paints, eventually.)

step one: sketch your drawing.  I used a white charcoal pencil, since the tile I was using is dark.

hello baby mushroom and tiny clouds...

step 2: apply color.  I use Prismacolor color pencils.  believe it or not, there are 14 different pencils used in this piece!  Prismacolors are my favorite pencils to use because you can layer the colors so easily.

it's really hard to photograph your strong hand with your weak hand.  sheesh.

step 3: step back and admire your work!

CUTE is pretty much the only word I can find to describe this.

front:
                      back.                     

Sunday, March 28, 2010

Easter Eggin' day 2

yesterday I dyed Easter eggs using ties.  you can read all about here.  I ran out of eggs, but still had some ties to use, so I corrected that issue as soon as I woke up and got busy on some tie-dying!

 the eggs on the left are from yesterday

these were the ties I didn't get to use the day before, I was really disappointed in the grey & pink stripes

I used the inside of this tie, the result was very different than the reverse!

 
ready to be boiled

I used the same water from yesterday- no need to be wasteful!

25 minutes is a long time to boil something, I caught up on my gossip.  according to STAR magazine, she is pregnant with his baby.  poor Sandy.


my favorite from the day

Easter basket, 2010


END.

the flowers are blooming in my garden


Saturday, March 27, 2010

Tie-Dying Easter eggs. Literally.


so, I look forward to Easter every year for 2 reasons: 1. Cadbury Creme Eggs (need I say more?)  and 2. dying Easter Eggs.  about a week ago I came upon a Tweet from justforfunhmn linking a blog post about tie-dying eggs.  TIE-DYE, not what you're thinking, good ol' multi-colored t-shirts from the 80's, oh NO!  these eggs were dyed using TIES.  as in, those things my step-dad wore religiously to work for the last 10 years and bought a new one of every year for his office Christmas party.  this lady's blog post was amazing, and really inspiring, so I knew I just had to do it!

today I went to my local Goodwill to hunt down some ties for my project.  lucky me, they had everything there I needed to begin my crafting, well, except for eggs- but I already had those...

the following ingredients are what you need:
ties, 100% Silk
plain t-shirt (white)
string or twist-ties
scissors
stock pot
eggs
water

total cost for me: $28 (including the eggs).  I know, I know, it seems rather expensive, but I couldn't decide between 10 ties, so I bought them all.  you can easily dye 2 eggs with one tie so you don't have to go as nuts as I did!  I also found my cute little basket and Easter grass there, so that added about $2.50 to the cost- who knew there was such great stuff there?!


to start: cut the ties.  now, there are many parts to a tie that I didn't realize before.  there is an inner sheath and also a lot of hidden stitches.  be careful while cutting as you may put holes in the delicate silk.

I was able to use the lining of this tie, too!

once you have the ties cut, you are ready to bundle the eggs!  place the eggs inside the tie so that the print is against the egg's enamel.  tie tightly.

eggs waiting to be boiled

next step is boiling*!  the blog called for the eggs to be wrapped in a t-shirt prior to this step, I have no idea why, but I followed directions like a good little girl.

boil for 25 minutes**

at this point I was lucky my cousin called to invite me to dinner.  I'm pretty sure I would've been too impatient to wait for the eggs to cool before removing them from their little cocoons.  the reveal:


for the most part I was really excited and happy with my results.  lesson learned: reflective ties definitely don't translate as well on the eggs.  dark colors like reds, blues and purples seem to have the best return, pastel pinks and greens don't.  distinct/intricate patterns work really well, compared to basic ones (like circles, those don't come across as well as a paisley or a stripe.)  you also need a lot of eggs.  I only had 7 in my fridge, and I was pretty bummed because I had more ties to use.  first thing tomorrow: egg shopping!  if you aren't used to working with ties, check the skinny end to find out if they're 100% silk.  you can also use old silk blouses or boxers, any silk fabric that you may have!  most of the silks can also be used up to 5 times, it takes trial and error to figure out which ones will work multiple times.  I've seen some posts that call for VINEGAR, if you choose to use vinegar- use 1/4 c. and make sure you have a glass or enamel pot to boil the eggs (metal will react to the vinegar).  from my understanding, using vinegar makes the eggs edible.

my favorite


*do not eat the eggs once they've been boiled, due to toxins in the silk
**do not boil the eggs ahead of time.

I still plan on dying eggs the traditional way because I crave egg salad sandwiches and deviled eggs this time of year as well.