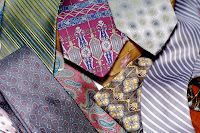
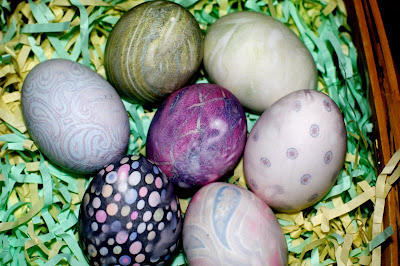
so, I look forward to Easter every year for 2 reasons: 1. Cadbury Creme Eggs (need I say more?) and 2. dying Easter Eggs. about a week ago I came upon a Tweet from justforfunhmn linking a blog post about tie-dying eggs. TIE-DYE, not what you're thinking, good ol' multi-colored t-shirts from the 80's, oh NO! these eggs were dyed using TIES. as in, those things my step-dad wore religiously to work for the last 10 years and bought a new one of every year for his office Christmas party. this lady's blog post was amazing, and really inspiring, so I knew I just had to do it!
today I went to my local Goodwill to hunt down some ties for my project. lucky me, they had everything there I needed to begin my crafting, well, except for eggs- but I already had those...
the following ingredients are what you need:
ties, 100% Silk
plain t-shirt (white)
string or twist-ties
scissors
stock pot
eggs
water
total cost for me: $28 (including the eggs). I know, I know, it seems rather expensive, but I couldn't decide between 10 ties, so I bought them all. you can easily dye 2 eggs with one tie so you don't have to go as nuts as I did! I also found my cute little basket and Easter grass there, so that added about $2.50 to the cost- who knew there was such great stuff there?!

to start: cut the ties. now, there are many parts to a tie that I didn't realize before. there is an inner sheath and also a lot of hidden stitches. be careful while cutting as you may put holes in the delicate silk.
I was able to use the lining of this tie, too!
eggs waiting to be boiled
next step is boiling*! the blog called for the eggs to be wrapped in a t-shirt prior to this step, I have no idea why, but I followed directions like a good little girl.
boil for 25 minutes**
at this point I was lucky my cousin called to invite me to dinner. I'm pretty sure I would've been too impatient to wait for the eggs to cool before removing them from their little cocoons. the reveal:
for the most part I was really excited and happy with my results. lesson learned: reflective ties definitely don't translate as well on the eggs. dark colors like reds, blues and purples seem to have the best return, pastel pinks and greens don't. distinct/intricate patterns work really well, compared to basic ones (like circles, those don't come across as well as a paisley or a stripe.) you also need a lot of eggs. I only had 7 in my fridge, and I was pretty bummed because I had more ties to use. first thing tomorrow: egg shopping! if you aren't used to working with ties, check the skinny end to find out if they're 100% silk. you can also use old silk blouses or boxers, any silk fabric that you may have! most of the silks can also be used up to 5 times, it takes trial and error to figure out which ones will work multiple times. I've seen some posts that call for VINEGAR, if you choose to use vinegar- use 1/4 c. and make sure you have a glass or enamel pot to boil the eggs (metal will react to the vinegar). from my understanding, using vinegar makes the eggs edible.
my favorite
*do not eat the eggs once they've been boiled, due to toxins in the silk
**do not boil the eggs ahead of time.
I still plan on dying eggs the traditional way because I crave egg salad sandwiches and deviled eggs this time of year as well.


Oh Wow! Going to raid the charity shops and buy some cheap eggs. Gorgeous.
ReplyDeletedo it Jean!
ReplyDeleteeven ties w/ stains on them work out just fine! make sure they are 100% Silk! good luck.
come back and share your pics w/ me- I'd love to see them!
This was the most amazing project! My kids L-O-V-E-D it ... and were completely beside themselves when it came time to "reveal" the eggs. Here is a link to my Facebook photo album showing the process for us:
ReplyDeletehttp://www.facebook.com/HoleaNicole?v=feed&story_fbid=1325336507026#!/album.php?aid=43427&id=1639302923
(Hope that works ...)
Thanks again Pam, truly awesome!!
I'm glad you tried it Holea and had as much success as I did! your kids really look like they enjoyed it!
ReplyDeleteyou also found some AMAZING ties to work with- I love all of the patterns!
great pics!
Doh ... that didn't work ... boo. (A little computer challenged over here.)
ReplyDeleteLet's try this ...
http://www.facebook.com/album.php?aid=43427&id=1639302923&saved#!/album.php?aid=43427&id=1639302923&ref=mf
If it doesn't work ... I made it public on my Facebook ... so anyone can view it. ;)